Using Price Modifiers and Product Options
Many site owners would like to give their customers the option to configure products; t-shirt colors and sizes, part upgrades, material types and more. These options might be no-cost options, or price altering options.
CartThrob has a system to help you add options to your products, and collect the customer's option selection. We generally call these options "Price Modifiers". Our price modifier system can be used to provide no-cost options, and options that increase or decrease costs as the need arises.
This system is comprised of two parts. 1. "CartThrob Price Modifiers" custom channel field (you can instead use Matrix… more on that later) and 2. Template tags for outputting the options and collecting customer selections. Though you may output your modifiers as checkboxes, radio buttons, select boxes or whatever you'd like, at a minimum you need to set an option value. If your option has an associated cost, you'll also need a price field. The CartThrob Price Modifiers custom channel field allows you to capture the following:
-
option_valueThis is the option value. The value here is the associate sku, or product code, or just a simple name that you'll use later to fulfill orders (ex. blue, large, ba_skel) -
price This is the price of the option. If a base price is set for your product, this price will be added to it.
-
option_name(Optional) This is a plain text description of the value. If the option's value is a gibberish sku that would make no sense to a customer you could add a description here. -
inventory (Optional) Your field will need to be mapped in CartThrob's product channel settings as the inventory field to use the inventory feature.
Configuring the Channel
Conventional Method using the "CartThrob Price Modifiers" custom
channel field
The conventional method of adding price modifiers to the ExpressionEngine backend is pretty straightforward.
-
Add a custom channel field to your channel with the type "CartThrob Price Modifiers" Fig 1.
-
If you plan on using inventory, map this field as the inventory field in CartThrob's settings > products > your channel > inventory field.
-
Begin adding data to your custom field. Fig 2.
-
Add template code to your site to output the options and gather info. See Example 1 template code below.
Using Matrix to add Price Modifiers
-
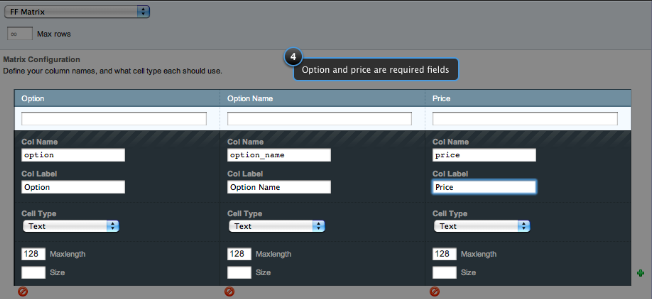
To use matrix to manage your options you just need to add two required fields called "
option_value", and "price" to your Matrix field. You may also add the "option_name", and "inventory" fields as well. The fields must use the following short names:option_value, price,option_nameand inventory. Fig 3. You can substitute this step for step 1 of the Conventional method above. Everything else in the process remains the same as those steps above. -
If you plan on using inventory, map this field as the inventory field in CartThrob's settings > products > your channel > inventory field.
-
Begin adding data to your custom field. Fig 2.
-
Add template code to your site to output the options and gather info. See Example 2 template code below.
Fig 1. Adding the field
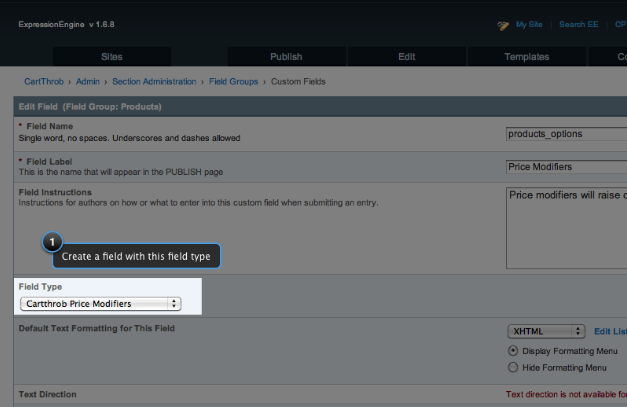
Fig 2. Adding options to your product
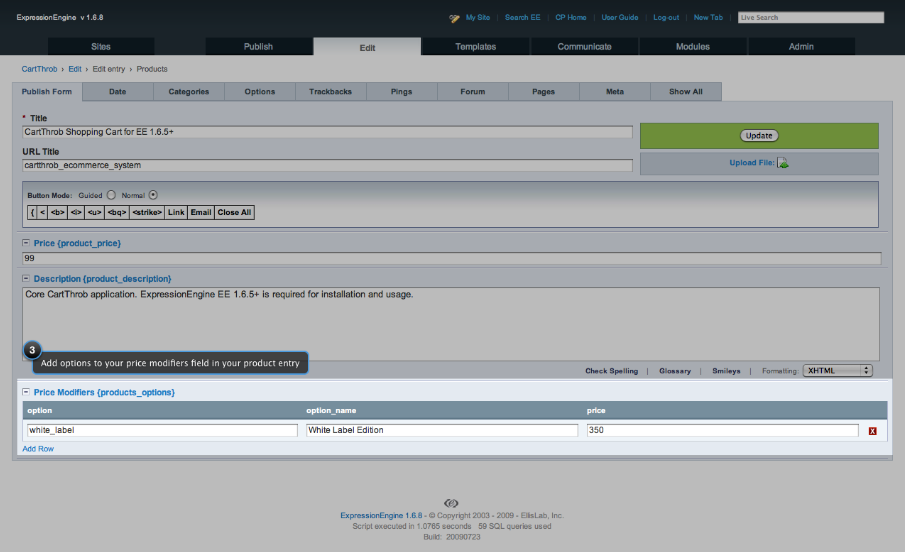
Fig 3. Alternate: Configuring Matrix
Creating a Template
The template you create to allow customers configure products should look something like one of the following
Example 1.
{exp:channel:entries channel="products" url_title="{segment_3}"}

{exp:cartthrob:add_to_cart_form entry_id="{entry_id}"}

{exp:cartthrob:item_options entry_id="{entry_id}" }
    {select}
        <option {selected} value="{option_value}">{option_name} {price}</option>
    {/select}
 {/exp:cartthrob:item_options}

{/exp:cartthrob:add_to_cart_form}

{/exp:channel:entries}
Example 2. Using Matrix.
(take note of the select's name attribute and also the option's value attribute):
{exp:channel:entries channel="products" url_title="{segment_3}"}

{exp:cartthrob:add_to_cart_form entry_id="{entry_id}"}
<select name="item_options[your_field_name]">
    {your_field_name}
        <option value="{option_value}">{option_name}</option>
    {/your_field_name}
</select>

{/exp:cartthrob:add_to_cart_form}

{/exp:channel:entries}
This example shows you how to use CartThrob functionality to manipulate prices and options. The standard method above uses prices set within a channel to calculate prices and totals based on user input. For more information about the various methods used to output price modifier options in templates, review the following Add to Cart Form tag.
Also, please note: there is also a less secure method allows you to completely ignore this process, manipulate and calculate prices directly within your templates. It's up to you to decide if you'd like to sacrifice some security for more flexibility.